
Sunday, November 25, 2012
Gobble !! Gobble !
Hope you all had a great Thanksgiving here are some quick cards I did with my silhouette and embossed with cuttlebug embossing folders.
 Thanks for stopping by!
Alicia
Thanks for stopping by!
Alicia
Monday, November 12, 2012
Children in Silhouette
This card was done for a children's church group that needed thank you cards to send to donors. They were open to any design concept and I thought this one of the children marching would be appropriate. The image is not stamped but cut out with the silhouette cutting machine and I was happy to be able to use one of my cuttlebug strips across the top. I always forget to use the strips and also the small square embossing folders on projects I need to use them more often. The inside was left blank so they could put their own sentiments and personal messages.
Thanks for stopping by
Alicia


Sunday, October 21, 2012
Fall Trio
Happy fall everyone !!! I hope you are enjoying this wonderful time of the year with all of it's beautiful colors. Fall theme was the challenge for this months card club and because I could not decide on which Fall Holiday to do I did them both along with just a general fall card. I did a tent base for the cards and used a different circle die cut from silhouette for all of the circles. I think I like the Thanksgiving one best with it's fancy folds. The folds were a breeze using the silhouette I can't wait to do more. Thanks for stopping by. Alicia


Friday, October 5, 2012
Beautiful Card Sad Day
Today's card was made for a dear old friend who's daughter recently passed from a motorcycle accident at the the age of 26. Her daughter was serving our country,a mom, a wife and daughter she will be missed by all.
The card was made by folding the front panel in half and then attaching a diecut to the fold. This card is similar to a swing card except it does not swing out
 .
.
 For the inside I duplicated the die cut and placed a stamp from Our Daily Bread inside. A cuttlebug folder gives the inside a nice emboss background.
Thanks for stopping by
Alicia
For the inside I duplicated the die cut and placed a stamp from Our Daily Bread inside. A cuttlebug folder gives the inside a nice emboss background.
Thanks for stopping by
Alicia


Tuesday, September 25, 2012
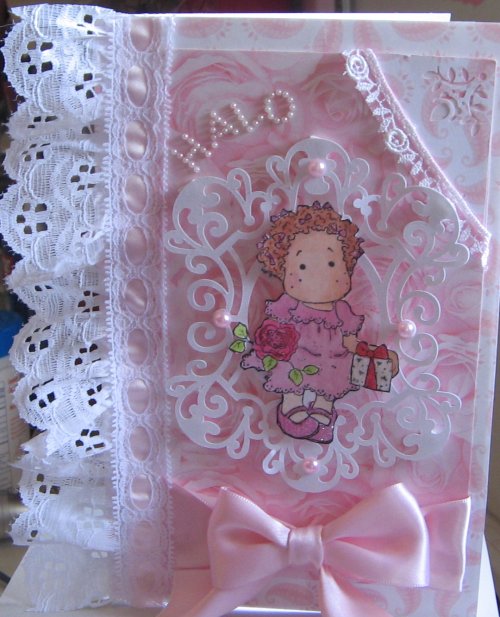
TWO !!!!!
It's been awhile since my last post I didn't realize how long until I started this post. I really need to get on a schedule!!!. Well one of the things I was doing instead of blogging was celebrating my granddaughters second birthday. A special birthday deserves a special card so of course lots of pink,lace and ribbon. The image is Tilda with ribbons I have been wanting it for awhile because it reminds me so much of my grandaughter. I hope you enjoy the card and I will be back soon with another post.
Alicia


Sunday, August 26, 2012
Spa Day Goody Bags
Well once again it is time for the girls to get away from it all. My niece and her friends yearly get away together and of course I am in charge of the gifts. This years theme is Spa Day. I found the cutest cut file on my scrap chick so I made two bags one with a face and cuccumber slices on her eyes and one with a pedicure.
Each girl received in her goody bag fluffy footies, nail clipper set, gel mask, sleeping mask, a card, a relaxing cd and a home made facial packet that I got off of pinterest. So relax and take a peek.


Monday, August 13, 2012
Oh Mcdonald Shutter
Okay did this a couple of months ago by request for a girl who is donating her birthday money to a charity that gives goats chicks and cows to poor families over seas.
I just used stickers and my silhouette to cut out the fence and Voila!!! LOL!!

 Thanks for stopping by.
Alicia
Thanks for stopping by.
Alicia


Tuesday, July 24, 2012
Black and Yellow Vellum Flowers
 Hello, Todays card was a challenge card to use vellum and make a flower for your card. Vellum is such a fun paper to work with because you can get so many different looks. I chose to die cut my flowers with a spellbinders sunflower shape and then stamp with a matching stamp from Heartfelt Creations. I tried many markers,pens,chalks until I settled on using copics. Hope you enjoyed todays card thanks for stopping by.

Monday, July 2, 2012
3D Birthday Butterflies
This card was so simple to make using the silhouette it did all the work for these 3D butterflies. I backed the inside of the card with blue gingham along with the trim. The card is business envelope size which makes it a little different from your normal A2 and A7 cards. A touch of $1 store bling finishes off the card Have a Great Day
 Alicia

Wednesday, June 27, 2012
Shop to you Drop
Just a fun card I did for my friend for her Birthday she loves to shop for shoes and handbags. The background paper has it all and I added the shopaholic lady from my silhouette library with all her haul.
 Thanks for dropping in today

Saturday, June 23, 2012
Graduation 2012


Sunday, June 10, 2012
Bike Ride
Just a quick post of a card I did for a friends birthday. I took a tombow class at Archivers to learn about the Tombow markers and of course I fell in love with them. Here is the card I made using the markers, the card is a side step desing.
Thanks for stopping by.

Saturday, May 19, 2012
Halo's Last Page
Hello everyone, Today I am posting a scrapbook page it is the last page in my grandaughters first year scrapbook. I got it finished just in time for Mothers day for her Mom and she loved it. I really did not want to be working on it and she was graduating college.
I am posting the last page because it was the favorite for most people, it also was so amazing how the photo came about. Halo was sitting with my sister playing with the camera, well it seems she had changed some of the settings which is why the photo is in sepia and not color. My sister did not know that halo had changed the settings and took her photo as Halo was longingly looking for her mom who had stepped out of the room for a moment.
Although Halo is 18 months in the photo I had to include it in the album.
The page has a transparency overlay that has a frame, I added the stickers hope wish and time along with the rhinestones. I also added the lyrics to If I could by Regina Bell to the background.
Thanks for stopping by have a creative day
Alicia
 <>
<>

Tuesday, May 1, 2012
Amazing Paper Grace
I had the best weekend I was able to meet one of my favorite card makers and bloggers Becca from Amazing Paper Grace.Becca was at the Adventures in Stamping convention in Akron, Ohio. If you have never been to her blog you are missing a real treat and if you have stopped by you understand why I was so excited. I guess beautiful people make beautiful things because Becca was so Friendly and willing to share her card making knowledge I felt like I was talking to a old friend. I tried not to stalk her too much didn't want her think she needed to get a restraining order !!! To put it in perspective for my husband to understand I told him if I were a teenager she would be my Justin Beiber(Insert high pitch teenage scream) The whole convention was nice of course my wallet will take a couple of months to recover from the trauma.
 I Guess I should sneak in a quick card . Yes I am hooked on making shutter cards this one used $1 store layered stickers . The base is glitter pattern cardstock.
 Thanks Stopping by
Alicia
Thanks Stopping by
Alicia


Saturday, April 21, 2012
Wedding or Birthday Shutter Card
Hello everyone, Todays card was made for my Aunt who turned 70 but after I made the card it looked more designed for a wedding needless to say I did not redo it because I thought it was a beautiful card and so did my Aunt.
The paper I used already had embossed flowers on it so I did not cut out any other layering pieces. The flower was made with spellbinder nestie flower die I think the Dahalia flower.

 The inside border is cut with a spellbinder die. I think the pearl and rhinestone flower on the front gives it that wedding look. I am sure I will make this card again for a wedding and again for a birthday except maybe a different color other than white.


Friday, April 13, 2012
Seaside in Chalk


Just a quick post because my computer is giving me the blues...........
These are cards I made for Card Club the challenge was to make a sea scape. For my cards I used chalk and then stamped my images (man in boat, sentiment,boardwalk and postage) on top of the scene. To get the look of clouds I ripped some paper and used the edges to chalk against. Thanks for stopping by Alicia
Wednesday, March 14, 2012
Beary Lucky St Patty's Day


Top of the mornin to ya!!! Here are two simple St. Patrick Day cards using the wonderful drawings of Elizabeth O . Dulemba. Elizabeth has a free digi every tuesday on her sight and this was this weeks adorable drawing. This lucky bear is colored with copics and a MS glitter pen popped on top of a cuttle bug folder and ready to bring good luck to the recipient.
Thanks for dropping by
Alicia
Saturday, March 3, 2012
Tilda in Chalk
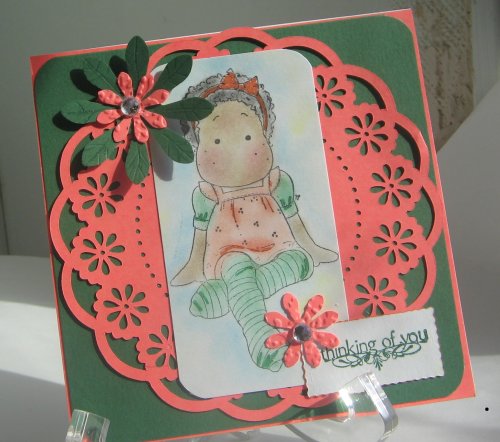
I must admit I mainly use my chalks for edging but last month in card club we had to use chalk on our cards. I took a step out of my comfort zone and chalked a image. I actually really like the chalk for doing skin tones(Copics are still my #1) and the chalk I used blends nicely and does not rub off on your hands at the touch of the card. The doily was cut with my silhouette and I used Martha Stewart glitter pens for a little extra sparkle. Thanks for coming by Alicia
Thursday, February 9, 2012
Artist Tray


Just wanted to do a quick post of a quick project. I made this Artist tray for a gift I love the way they come together so easily just plop in photos ,paper and embellishments and your done. It is a quick project that can be made to be very personal. I did use my silhouette to cut out the "Son is a gift" that is what is so neat about the silhouette you can make your embellishments any size to fit your projects. I already have some ideas for future gifts can't wait to share them with you!!!
Thursday, February 2, 2012
Tea Time 3d project


Hello, today I am sharing a project I made last year for my nieces girls getaway. It is a mixture of two different die cutting sites. The Asian dolls are from My scrap Chic and the Tea Cup and Tea Pot are from My Time, My Creations, My Stampendence both online sites with GSD files. I cut the tea pot Asian Dolls and large tea cup out with my silhouette. Each girl received a Asian Doll Card,a tag,large paper tea cup filled with tea bags, a bamboo place mat and a actual tea cup and saucer. Until next time. Alicia
Thursday, January 26, 2012
One Layer Card

We had a challenge a few months ago in card club for a one layer design. This is always a challenge for me because I never know when enough is enough. So here is a simple one layer card just stamping and dry embossing..........yes I would love to add more LOL!!!
Wednesday, January 18, 2012
Sticker Shock Shutter Card


This months card for my card club(C.L.O.C.K) was to make a card using stickers. Well when this came out the challenge jar there was a deep gasp in the room from everyone except Kim our sticker queen.The rest of us have a little trouble incorporating stickers into a card but the outcome was some of our better cards. I chose to do my card as a shutter card this type of card with all of its little spaces is perfect for stickers. I embossed the background paper with the heart cuttlebug folder and the stickers I found at Dollar Tree what a deal.I posted the other 3 cards from Kim, Jeannette and Denise.
See ya next time.
Alicia
Friday, January 6, 2012
Greek Plaque


My good friend recently joined the grad. chapter of a sorority AKA. We had talked about joining when we were in college but never got around to it during our undergrad years. Well she took the plunge and did it this past fall so I had to make her something for her accomplishment so I came up with this plaque. If you follow my blog you have seen me make these for shower gifts with the babies name. I did this one with the sororities letters as the focal point and her name off to the side. The right side has a paper doll next to the year she joined while the left side has her name in pearls and her line number in glitter. I used pre made dollies and dollies cut with my silhouette the doll was also cut with the silhouette. The colors are pink and green not the exact shades of the sorority but what I had on hand when I decided to make the plaque.
Thanks for stopping by
Alicia
Subscribe to:
Posts (Atom)