Saturday, December 31, 2011

Thank -You and Happy New Year


Wow my last post of 2011 and I want to thank everyone for stopping by my blog. I know my post have not been consistent but I will try to do better in 2012 so stick with me. I also will try to visit more of your blogs so if you drop by please leave a comment with your blog address. For those of you who I already have your blog address I will try to leave more comments in 2012.
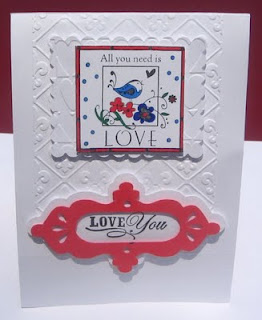
Now on to the beautiful card for today, I think a thank you card is perfect for the last post of the year and this is not one of my own cards but was done by my friend Ann Krucek. I love this type of card with clean lines and just the right touch of embellishments. I seem to never know when or how to stop adding embellishments to my cards which is why sometimes it takes me so long to do a card. This card has the right mixture of texture which comes from the dry embossing and pattern paper to give it a nice visual balance. I can't wait until Ann starts her own blog which will be filled with all kinds of crafts. I will post her website once she gets up and running.
I hope you all had a Wonderful Holiday and have a Healthy and Prosperous New Year.
Alicia

Thursday, December 22, 2011

More Christmas Tags


I decided to show a few more Christmas tags I made this week. All of the tags were chalked for a vintage look.

Tuesday, December 20, 2011

Card Club HolidayMeeting


Tonight was our card club Holiday celebration after having to postpone our November meeting due to members being under the weather we had a lot to share. Denise gave a tutorial on coloring skin tones with chalk and brought some images for us to practice on. We shared our one layer challenge cards from the postponed November meeting ( I will post my one layer cards later). One layer cards are a challenge for me because I never know when to stop embellishing. We also exchanged handmade Christmas cards each card was very pretty. Lastly we exchanged gift bags filled with items adding up to a total of $5.00 . Below is the bag I made for the exchange along with the cards and tags. The directions to make the bag I got free from Archivers. The card is one I did a few years ago really wanted to do it again I love the little angel that I got from "Digital Pencil too". The tags are chalked to give a vintage look stamped and embossed. The Poinsettia was cut out with my silhouette embossed to give it texture and covered with glitter paint for a light shimmer. Come back again this week for more Christmas tags and cards.


Wednesday, November 16, 2011

Scrapbooking by the Lake

Yes I do find time to scrapbook.........when invited to a crop. I find it so much easier to make cards these days but once I start scrapping that is all I want to do.
I was lucky enough to be invited to a two day crop at Congress Country Club by my friend Jill Hardie. It was one of the most relaxing and beautiful places I have scrapped. The space had a beautiful view of the lake and the pool which of course at this time of the year was covered. The manager of the lockeroom was very attentive and pleasant. I was able to get quite a few pages done which I hope to share with you soon. Below are just a few shots from the weekend with Jill and my other scrapbooking buddy Ginny.


Sunday, November 6, 2011

Paper Piecing with Silhouette


Hello, today I am posting a card we did awhile back in card club. Our challenge was to make a punch or paper piecing animal. This was super easy using one of the great files from www.myscrapchick.com and my silhoutte. We have to make a card for each person in the group for the challenge so needless to say using a cutting machine saves a lot of time. I chose a baby duck from a cutting file from myscrappychick it is so easy to download a file and on Fridays you ge a free one!!! My one hang up when doing faces on a animal or person is the eyes well myscrapchick even has some free printable eyes which I used on the Duck. I added some depth with chalk around the eyes and Voila! a great pair of eyes.

Monday, October 31, 2011

Late Halloween Post

Seems I missed the bewitching hour with my Halloween post but thought you would like to see the project for October card club anyway because if you just change the theme it can be used for any holiday. We had to make a card using a paper bag needless to say my card is more of a mini album than card. I used the technique that I watched on you tube from "following the paper trail". The technique is called a gate fold paper bag. For the project I used orange paper treat bags the majority of the embellishments were cut with my Silhouette with a few store bought cut outs and some hand made tags.Enjoy!


Tuesday, October 11, 2011

Updated scraproom/craftroom

Sometimes you just have to clear your space so you can feel creative. Which is exactly what I had to do in my craftroom. I cleared eveything out even those things that I am sure one day I will need. Getting rid of clutter is so freeing once you are able to let go. Changing furniture around also gives you a feeling of being in a new space. I changed my color scheme slightly got rid of some of the pink all of the blue and purple and added black for more of a pink,black and white color scheme. I was on a tight budget so I had to freshen up old furniture. My first project was spray painting my old plastic drawers. I used Krylons Fusion for plastic it really gives a neat look. I took the drawers out and at first sprayed them from the inside but that gave a matted look so I sprayed from the outside which gave it a more rich color. I added ribbon trim for a nice accent. I love they way they look and plus it hides all the junk inside.
The next project was covering my old chair. I didn't follow any of the directions you can find on the net I just kinda wrapped and stapled where needed and as long as you don't look at the bottom it doesn't look half bad.
Here are more picks of my paper storage/stamping table and
ribbon/embellishment table


If you would like to see more of my room checkout my you tube video You can also find a video of my room before the update on my you tube channel . Come back soon to see all the creative juices my updated room inspired me to create.

Thursday, August 11, 2011

A Quick Thank you Card


I am so thankful for beautiful PP it made this card a snap to put together. When you have beautiful paper a lot of layering and stamping is not needed the paper itself is enough. I did this for a family member who needed a thank you card for a nursing home that had taken care of his wife. All I did was stamp the sentiment and add ribbon the card is a little large 5 1/2 by 7 and flips open from the bottom a tip I learned from Becca at Amazing paper Grace it gives you extra room for design space.
Thanks for stopping by!
Alicia

Sunday, July 3, 2011

Happy 4th


Just a quick post with two 4th of July cards one is old but had not found a home, the second one(bears in wagon) is new but done with a old stamping up set. Hope you all have a great 4th.

Tuesday, June 14, 2011

Rolling into Another Birthday


A simple birthday card using one of Kenny's digis. The image is colored with copics and popped on the front of the card. The inside sentiment refers to another year rolling by.tfl.

Sunday, May 29, 2011

Anniversary #7!!!


Wow can't believe I have been married for 7 years!!! Time really does fly when you are having fun. I made this card for my hubby it is always a challenge for me to make a masculine card(no glitter! no bows!no flowers! Oh No!)okay I did sneak a few flowers in on the stamp image. One thing about making masculine cards you kinda have to keep it simple which makes for a faster pulled together card. On this card I used a cuttlbug embossing folder, a $1 stamp,and embosed some straight lines with my score pal.
Hope you all have a wonderful holiday weekend!!!

Wednesday, May 18, 2011

Card Club

I recently joined a couple of other ladies in a card club. We meet once a month and share card ideas and techniques,each month there is a theme and this month I got to choose the theme. My theme was to have a hand made flower on your card it was fun to see each persons flower they were all so different. I used a flower technique I had learned on youtube on both of my cards. Both cards used a 5 petal flower to make, I made a stair step card and used a MS punch for the lattice work on one card the other card (peachy color) lattice work is cut from my silhouette. I also have posted the other members cards which are both beautiful! First Denise her cards feature Billie Holiday her hand made flowers were perfect for her image. Next is Kims cards her flower had the clean lines to go along with her uncluttered beautiful teal blue card. Enjoy!


Sunday, May 8, 2011

2011 Mothers Day


Just a quick post to wish everyone a happy Mothers day and to share with you a card. I am really into hand made flowers and this hydrangea is one of them . Super simple to make I got the instructions off a you tube video from vandeler. The embelishments on the card base were cut out with the silhouette. The lavender card only has a few blossoms but same technique. I will post two more tomorrow see you then.

Saturday, April 30, 2011

Chit Chat Birthday Card


I have a lot of Birthhdays in April but this was my favorite card. It was for a dear friend who no matter how long it has been since we have chatted we always have tons to laugh about. I thought this design by Mo Manning at my digtalpencil was the perfect image for us. The coloring was done with my copics , I used my silhouette to make the doily background. The card is large 5x7 and flips open instead of from the side . This also gives you a lot of room to create on the front. Thanks for stopping by!

Sunday, April 24, 2011

I'm Late I'm Late


Yes I feel like the rabbit in Alice in Wonderland I don't know how Easter came up so fast. I also was late on a birthday card too, it seems like the month just started and then BANG!! it's almost gone. This all means I had to rush and make some cards to send of course they will all have a belated theme. I made them as simple as possible and used a design I go to often when I need a card in a hurry. Both Spring cards also known as late Easter cards use the scalloped nested nestibilities and a small wooded $1 stamp. The birthday card uses a small clear $1 stamp. I really plan to be ahead of the game next month.......I have about 6 days to pull that off in LOL!!!.

Wednesday, April 6, 2011

Bling Chic


I love the hip images of KennyK's designs they are perfect for teen or young adult cards. For this card I just added some extra bling on the side and let the pattern paper fill the rest of the card. The image is a fun and funky girl who I colored with copics and added a few stickles to add bling to her glasses and belt.
Until next time

Sunday, February 6, 2011

Two roses in the snow


Well it has been awhile since my last post but I have been really busy with work and making these wedding invitations. The theme of the wedding is two roses intertwined in the snow, it is from a poem. I embossed the base and stamped two roses on a oval scalloped separate piece. Outlined some of the embossed snowflakes with stickles and inserted the inside information and that is it...........just do it 50 more times LOL!!! Whew!!!

Thursday, January 6, 2011

Happy New Year!!!


Hope you all had a wonderful holiday and the New Year is treating you well. I thought I would post the easel calender cards I popped in the mail today for my 2 buddies. I have seen these all over the internet and thought it would be fun to give them as little New Years gifts eveybody needs a new calender in January. I always love easel cards because they give the receiver a different way of displaying their cards. Both cards were made from my scrap bin and the calender was from splitcoastampers blog in the forums section under templates/downloads. You can also find the directions for making the easel card there under resources at the top of the page super easy. The frame around the first card was cut with my silhouette. The second cards scalloped circles were made using nestibilities. I hope you will give these cards a try.
Thanks for stopping by
Alicia