Monday, November 25, 2013

Julie Nutting Dolls

I am obsessed with the prima dolls by Julie Netting it is a perfect fix for the little girl in me that still wants to play with paper dolls. These two cards were done for milestone birthdays sweet 16 and 21 each has a unique look that I think fits each age. The card fold is a accordian which really helps to highlight the dolls accordion cards are 5.5 x 12 but I made mine 7x12 to accomodate the dolls height. I know a lot of people just use the dolls for tags but there are so many more possibilities which I hope to share  in the next few weeks with you. I think double sided paper works best with the accordion but any paper will work.
Thanks for dropping by Alicia

Wednesday, October 30, 2013

Scary Pop Up Cards

Boo !!! I have some fun Halloween projects to share with you today first up is a set of pop up cards I made using the silhouette and a design from the online store. This easy pop up card can easily be changed for any season or event. I altered my design cover and inside images from the original to make them a little more original.
Now what is Halloween without a trick or treat bag? This is a split personality bag the one side is your mild midnight scene while the flip side is your horror side. I used the silhouette to cut the house and grave yard, stamped the flying witch and sentiment. The horror side was done with clipart with some added 3-D effects and stickles.

Tuesday, October 22, 2013

Paint Chip Cards

 Hello
 
Hope you all are enjoying some beautiful fall weather. Today I am sharing two cards I did for my card club.
Our challenge was to make a card using paint chips from the paint section of the store. For those of you who can't quite figure out what I am talking about it is the paint swatches you get to take home to match your decor. I guess I should thank Walmart, Homedepot and Lowes 
for the contribution to our challenge (smile)
Now to my cards I used the circle paint chips for my card  the circles are already on the paper I just embossed over them for a more textured look. The scalloped circles are spellbinders and the stamped sentiment is from the $1 bin. The pink card has a store bought embellishmentand and the same spellbinder
scalloped circles. hope this inspires you to take a trip to the paint section for your next card.

Monday, October 7, 2013

100 Years

Today I am sharing one of my favorite images I just love this sweet senior couple by Mo Manning at digital pencil too she has the most adorable images. I have often used this couple for Valentines cards,Anniversary and this time for my husbands birthday last month. I paired it with a favorite verse, colored it with copics and added a sentiment inside. Masculine cards are my least favorite to do so I think I will make a few more to try to improve Thanks for dropping in Alicia

Saturday, September 14, 2013

Magnolia Birthday Card 3

Well it has been quite awhile since my last post but hopefully today's card will make up for that lasp in post. This is a card for my grandaughter who is turning three and is having a fairy party. I thought this magnolia stamp would be perfect for the theme of the party. This little fairy is blinged to the max with glitter and sparkle.The card is actually a z fold, her wings are from a large butterfly I found in Micheals. Copics give this little fairy her color, the tiny flowers are made by hand using a die from the silhouette store and then quilled into a flower. Hope you enjoyed this little lady and hope to be back soon with more cards.

Wednesday, July 3, 2013

Happy 4th of July 2013 !!!

Just a quick card and wishes for a happy and safe 4th

Friday, June 21, 2013

Post Card Challenge

Today I am sharing cards from my card club members in C.L.O.C.K. This month we shared our post card themed inspired cards. Our challenge was to make a card with a post card theme the ladies were really creative with this one. We also had to make Card Candy to exchange so that the person receivng it will be making a card next month with the candy they received this month.  Here is Denise's description of the cards:
 Layers were definitely in! Alicia created a post card-card. Alicia's card utilizes a tag as post card on stamped card stock. She used manila  envelop colored card stock and brown ink for the details of the card. A blue sparkle filligree is stamp on the card, brushing against the baby blue bow. Three hand-made roses grace the right hand corner of the card. Inside the card is a canceled post mark with room to write a note.
 Peri's card illustrated Tim Holtz's distressed ink on a layered surface. She used puzzle pieces that were designed not to interlock. The message on the post card: My pieces don't fit without you. The post card is mounted on pre-stamped cardboard.

Jeanette's card--from Paris "Oooh la, la! Jeanette used a blocking technique to illustrate the Eiffel Tower blocking the view of a bicycle. A mini Paris post card graces the front right hand corner. The post card is mostly black and white with blue dabbed on the surface. The flowers in the bicycle basket are painted with ink as is the "Roma Hotel" stamp in the left hand corner. The back of the post card has place for a stamp and Oooh la la is stamped across the top.
Kim used12 plus stamps to decorate her post card. The card is layered brown, red, pink and tan. Like Jeanette, Kim used a blocking technique by creating an image of a Greek woman as the clock face. Kim distressed the edges of the card and finished it in tattered mist. Below is a photo of my card  candy that Kim will be using.
Sorry I don't have the description of Denises card but as you can see from the photo it is a work of art mixing crafting with a little education by using a historical figure. The colors of the cards were just beautiful nicely blending from one to another. Denises technique for making a card a little more than just a card really shows up in this one.
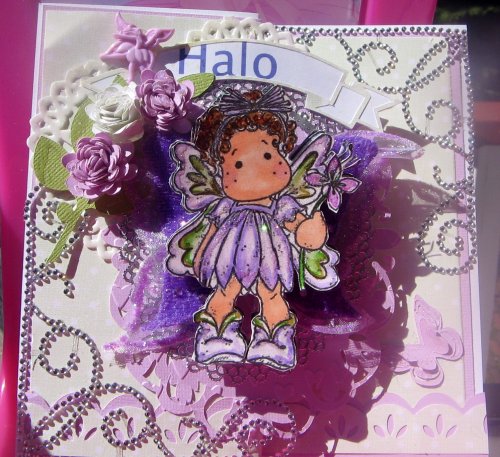


My card


Cards from the ladies


Card Candy


Saturday, June 15, 2013

Fathers Day card 2013

Happy Fathers Day! Masculine cards are my least favorite cards to make thank goodness I can just pull a shape off my silhouette.  This card is for my Dad who in his younger days was a golf fanatic.  All the images are cut from the silhouette  the side panel is embossed using a cuttlebug folder.
 Alicia

Friday, June 14, 2013

Hello, today I wanted to share one of my new favorite cards to make a "cascade". I like  the cascade card because you can get so many different looks and it can be used for so many occassions. When first looking at the card it may seem a little confusing but actually it is quite simple. The best directions I have found are  by www.frenchiestamps.com she has a great youtube video she cuts down on a lot of the measuring.
Hope you enjoy the card despite the poor photo.

 Alicia

Sunday, May 26, 2013

Double Display Card

Hello everyone, well after a hectic work season and cleaning up all the spam comments I am now able to blog again. I hope you all stay with me and I will try to be more consistent in my blogging. Now for my card this is a double display card which is very much like the shutter card except larger. I made this one for my card club buddy Kim's birthday. I found the directions on pinterest they were very easy the tricky part just like with the shutter card is getting the folding right. Hope you enjoy the card!!!

Wednesday, January 23, 2013

Cascading Card

Whew!! finally the last of the Christmas cards LOL!! actually I did not make my normal 30 something Christmas cards. This year I made a select few and the rest were store bought (Gasp in horror). I was much too busy this year to have time to make them (or just did not manage my time well). My card club just exchanged Christmas cards and gifts this month due to everyone being sick with the flu. The cards I am sharing with you today were made for my card club the style of card is called a cascading card super easy to make. The women were cut with my silhouette along with the car front. I saw this idea on Pinterest www.callalilystudioblog.blogspot.com her card was so adorable she called it retail therapy and Ihad to give it a try. Thanks for stopping by Alicia

Thursday, January 3, 2013

Double Shutter

Happy New Year everyone, Hopefully in the new year I will have a more consistant blogging schedule that is one of my resolutions we will see how that goes LOL!!. Todays card is double shutter card it is made simply by making two shutter cards and joining them together in the back. The frames on the front of the card were cut with the silhouette and 3d stickers were added to the inside. I also used double sided cardstock for the base. Thanks for stopping by have a great new year!!